Secret Management Part 1: Installing OpenBao and Securing the First Secret
Kubernetes Secrets aren't encrypted — just base64. I installed OpenBao and ESO to move the TransIP API key into a proper vault and verified cert-manager still works.
Introduction
You are probably well aware that Kubernetes Secrets are not secrets. That sounds dramatic, but it is accurate: the values stored in a Kubernetes Secret are base64 encoded, not encrypted. Anyone with kubectl access to the cluster can decode them in seconds with a single command. Despite the name, they offer no real protection for sensitive credentials.
I have known this since the beginning. When I installed cert-manager on the Bletchley cluster and needed to store the TransIP API key for DNS-01 challenges, I created a plain Kubernetes Secret and accepted the risk explicitly in the decisions log. The note read: "before any credential more sensitive than an API key is stored in the cluster, proper secret management must be in place." That was March 2026. Now, with Forgejo running and the cluster otherwise production-ready, it is time to close the gap.
This post walks through installing OpenBao — the open source Vault fork under the Linux Foundation — alongside the External Secrets Operator, and migrating the TransIP API key out of its plain Kubernetes Secret and into the vault. One secret, properly managed, with cert-manager verified working end-to-end. The remaining cluster secrets follow in Part 2, and auto-unseal comes in Part 3.
🏠 This is part of the Homelab Journey series - building a production Kubernetes cluster from scratch.
- k9s
- Secret Management Part 1: Installing OpenBao and Securing the First Secret (you are here)
This post assumes cert-manager is already installed and managing certificates via DNS-01 challenges. See Certificate Management on the Bletchley Cluster for context.
Why Not Just Leave It
The TransIP API key is used by cert-manager to prove domain ownership when requesting Let's Encrypt certificates. Stored as a plain Kubernetes Secret, it is accessible to anything with cluster read permissions — encoded in base64, not encrypted. The cluster is on VLAN 140 with no external access, and OpenBao itself runs with hostNetwork: false (the default), so it communicates only over the pod network rather than directly on the node's network interface. These are real mitigations. But they protect the perimeter, not the data. If the secret were accidentally committed to git, printed in logs, or reached by a misconfigured RBAC policy, it would be exposed with no audit trail, no rotation mechanism, and no way to know it happened. Perimeter defence and data protection are not the same thing — both matter.
The goal for the Bletchley cluster has always been to run it as if it were a team-managed production environment — not because it is, but because the habits matter. A team would not accept plain Kubernetes Secrets for credentials. Neither should I.
Choosing a Secrets Management Approach
Several options are available for secrets management on Kubernetes. I evaluated five:
| Option | What it is | Open source | Overhead |
|---|---|---|---|
| Sealed Secrets | Encrypts Secrets into CRDs safe for Git | ✅ | Low |
| ESO + 1Password Connect | Pulls secrets from 1Password at runtime | ✅ | Medium |
| OpenBao + ESO | Self-hosted vault + operator | ✅ MPL 2.0 | Medium-High |
| HashiCorp Vault + ESO | Self-hosted vault + operator | ❌ BSL 1.1 | High |
| SOPS + age | Encrypts files for Git | ✅ | Low |
Why not Sealed Secrets or SOPS: Both solve the Git problem — they let you commit encrypted credentials safely. But neither solves the in-cluster problem. SOPS still materialises plain Kubernetes Secrets at apply time. Sealed Secrets does encrypt in etcd, but it is a one-way system: no centralised management, no audit log, no policy, no path to dynamic secrets.
Why not HashiCorp Vault: HashiCorp switched Vault from MPL 2.0 to BSL 1.1 in August 2023. It is no longer OSI-compliant open source.
Why OpenBao: OpenBao is the community fork of Vault under the Linux Foundation, staying on MPL 2.0. It is API-compatible — all tooling, documentation, and integrations work identically. It provides centralised secret management, audit logs, fine-grained policies, and a path to dynamic secrets later. The operational overhead is real, but intentional: running a production-grade secrets vault is exactly the kind of thing I want to learn.
The External Secrets Operator (ESO) bridges OpenBao and Kubernetes. It watches for ExternalSecret resources, fetches values from OpenBao, and creates regular Kubernetes Secrets in the target namespaces. Workloads like cert-manager consume those Kubernetes Secrets as normal and have no knowledge of OpenBao at all.
Installing OpenBao on Bletchley
Helm values
OpenBao installs via Helm. The key decisions for Bletchley:
- Single replica — HA adds complexity without benefit for a homelab
- Raft storage on a Longhorn PVC — integrated storage, no external database needed
- Injector disabled — the agent sidecar injector is not needed since ESO handles secret delivery. Disabling it also eliminates one of the PodSecurity warnings from the chart
- Backup labels on the PVC — consistent labelling for the future backup automation
One important note on image configuration: the chart treats registry and repository as separate fields. Setting repository: quay.io/openbao/openbao causes the chart to produce quay.io/quay.io/openbao/openbao — a doubled registry prefix. The correct form is:
server:
  image:
    repository: openbao/openbao
    registry: quay.io
The full values file:
# apps/openbao/openbao-values.yaml
injector:
  enabled: false

server:
  image:
    repository: openbao/openbao
    registry: quay.io
  ha:
    enabled: false
  standalone:
    enabled: true
    config: |
      ui = true
      listener "tcp" {
        tls_disable = 1
        address = "[::]:8200"
        cluster_address = "[::]:8201"
      }
      storage "raft" {
        path = "/openbao/data"
      }
  dataStorage:
    enabled: true
    size: 1Gi
    storageClass: longhorn
    labels:
      backup.vluwte.nl/enabled: "true"
      backup.vluwte.nl/retain: "default"
      backup.vluwte.nl/full-backup-interval: "default"
      backup.vluwte.nl/concurrency: "default"
PodSecurity warnings
The install produces one remaining PodSecurity warning about the openbao container not setting capabilities.drop=["ALL"] and seccompProfile. I investigated this thoroughly:
- Adding these settings to values has no effect — the chart template overrides them
- This is a known upstream gap, tracked in openbao-helm#154
IPC_LOCK/mlockis not a concern: OpenBao removed mlock entirely in PR #363 because it is incompatible with Raft/bbolt integrated storage and provides no real benefit in a containerised environment
The warning is accepted as a known upstream limitation. It is advisory — the pod runs fine.
Install
helm repo add openbao https://openbao.github.io/openbao-helm
helm repo update

helm install openbao openbao/openbao \
  --namespace openbao \
  --create-namespace \
  --values ~/talos-cluster/bletchley/apps/openbao/openbao-values.yaml
The unseal ceremony
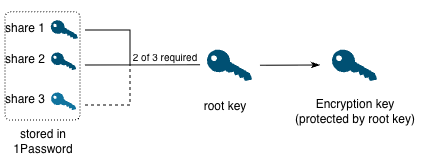
OpenBao uses Shamir's Secret Sharing to protect the master key — a cryptographic scheme that splits a secret into n shares where any k are sufficient to reconstruct it, but fewer than k reveal nothing. No single share is useful on its own, and you don't need all shares to recover the secret. On first initialisation, the key is split into shares: you specify how many to create and the threshold required. For Bletchley: 3 shares, threshold of 2.
The diagram below shows how this works: three shares exist, any two reconstruct the root key, the root key protects the encryption key. Share 3 is never submitted — it stays in 1Password as the spare.
kubectl exec -n openbao openbao-0 -- bao operator init \
  -key-shares=3 \
  -key-threshold=2
This outputs three key shares and a root token. This is the only time they are shown. Store all of them in 1Password immediately before doing anything else.
Every time OpenBao starts, it comes up sealed — it knows it has data but cannot read it. Unsealing requires providing the threshold number of key shares:
kubectl exec -n openbao openbao-0 -- bao operator unseal <key-share-1>
kubectl exec -n openbao openbao-0 -- bao operator unseal <key-share-2>
After the second share, OpenBao is unsealed and operational:
kubectl exec -n openbao openbao-0 -- bao status
Seal Type               shamir
Initialized             true
Sealed                  false
Storage Type            raft
HA Mode                 active
Manual unseal after every restart is the operational reality until Part 3, where auto-unseal via a transit OpenBao instance on Proxmox will eliminate this step. For now, the two unseal keys in 1Password are the recovery mechanism.
Configuring OpenBao
Root token handling
The root token has unlimited permissions and no expiry. The correct pattern is to use it for initial setup, revoke it, and only regenerate it temporarily when privileged operations are needed. Every time you need root access after the initial setup, you run the generate-root ceremony using 2 of 3 key shares:
# Start the ceremony
kubectl exec -n openbao openbao-0 -- bao operator generate-root -init
# Returns: OTP and nonce

# Submit key share 1
kubectl exec -n openbao openbao-0 -- bao operator generate-root -nonce=<nonce> <key-share-1>

# Submit key share 2 — returns an encoded token
kubectl exec -n openbao openbao-0 -- bao operator generate-root -nonce=<nonce> <key-share-2>

# Decode with the OTP from the first step
kubectl exec -n openbao openbao-0 -- bao operator generate-root -decode=<encoded-token> -otp=<otp>
The OTP and nonce together ensure the encoded token is useless without both pieces — neither alone reveals the root token.
Enabling the secrets engine and Kubernetes auth
With root authenticated:
# Enable KV v2 secrets engine
kubectl exec -n openbao openbao-0 -- bao secrets enable -path=secret kv-v2

# Enable Kubernetes auth method
kubectl exec -n openbao openbao-0 -- bao auth enable kubernetes

# Configure it with the cluster API endpoint
kubectl exec -n openbao openbao-0 -- bao write auth/kubernetes/config \
  kubernetes_host="https://10.0.140.10:6443"
The Kubernetes auth method lets ESO authenticate to OpenBao using its ServiceAccount token — no static credentials needed. OpenBao validates the token against the Kubernetes API and exchanges it for a short-lived OpenBao token scoped to the ESO policy.
ESO policy and role
Create a policy allowing ESO to read secrets from the KV store. The policy file is written to /tmp inside the pod (ephemeral, gone on restart) and used only as input to bao policy write — the policy itself is stored in Raft:
kubectl exec -n openbao openbao-0 -- /bin/sh -c 'cat > /tmp/eso-policy.hcl << EOF
path "secret/data/*" {
  capabilities = ["read"]
}
EOF'

kubectl exec -n openbao openbao-0 -- bao policy write eso-policy /tmp/eso-policy.hcl
Bind ESO's ServiceAccount to that policy:
kubectl exec -n openbao openbao-0 -- bao write auth/kubernetes/role/eso \
  bound_service_account_names=external-secrets \
  bound_service_account_namespaces=external-secrets \
  policies=eso-policy \
  ttl=1h
Revoke root when done. The policy and role are persisted in Raft — they survive pod restarts.
kubectl exec -n openbao openbao-0 -- bao token revoke <root-token>
The bound_service_account_names=external-secrets and bound_service_account_namespaces=external-secrets values match the ServiceAccount that the ESO Helm chart creates automatically in the external-secrets namespace. When ESO makes a request to OpenBao, it presents its ServiceAccount token; OpenBao validates that token against the Kubernetes API and checks it matches this role binding before issuing an OpenBao token scoped to the eso-policy. Nothing manual is needed — the Helm install creates the ServiceAccount, and the role binding here is what connects it to OpenBao's access model.
A kv-admin token for routine operations
Rather than regenerating root every time a secret needs to be written, create a less privileged admin token for KV operations. This requires root one more time:
# Inside an interactive pod shell to keep credentials out of local history
kubectl exec -it -n openbao openbao-0 -- /bin/sh

# Create the admin policy
cat > /tmp/kv-admin-policy.hcl << 'EOF'
path "secret/data/*" {
  capabilities = ["create", "update", "read", "delete"]
}
path "secret/metadata/*" {
  capabilities = ["list", "read", "delete"]
}
EOF

bao policy write kv-admin /tmp/kv-admin-policy.hcl

# Create the token
bao token create -policy=kv-admin -display-name=kv-admin -orphan -ttl=768h
The -orphan flag means the token is not tied to the root token's lifecycle — it stays valid after root is revoked. Store the token and its accessor in 1Password. The 768h (32 day) TTL is intentional for now: short enough to practice rotation, long enough not to expire immediately.
Revoke root again. From this point, the kv-admin token handles routine secret management.
Storing the TransIP Secret
The TransIP API key is an RSA private key in PEM format — multiple lines, not suitable for pasting on the CLI where it would appear in shell history. The approach: enter an interactive shell in the pod, write the key to a temp file, use bao kv put with file input, clean up.
kubectl exec -it -n openbao openbao-0 -- /bin/sh

# Login with kv-admin token
bao login <kv-admin-token>

# Write key to temp file — single-quoted EOF prevents shell expansion
cat > /tmp/transip.key << 'EOF'
-----BEGIN PRIVATE KEY-----
...
-----END PRIVATE KEY-----
EOF

# Store in OpenBao using @ to read from file
bao kv put secret/cert-manager/transip apiKey=@/tmp/transip.key

# Clean up
rm /tmp/transip.key
exit
Verify:
kubectl exec -n openbao openbao-0 -- bao kv get secret/cert-manager/transip
========== Secret Path ==========
secret/data/cert-manager/transip

======= Metadata =======
created_time    2026-03-31T18:56:32Z
version         1

===== Data =====
Key       Value
---       -----
apiKey    -----BEGIN PRIVATE KEY-----
...
Installing the External Secrets Operator
ESO is a straightforward Helm install with no cluster-specific configuration at this stage:
helm repo add external-secrets https://charts.external-secrets.io
helm repo update

helm install external-secrets external-secrets/external-secrets \
  --namespace external-secrets \
  --create-namespace
Three pods come up in the external-secrets namespace: the main operator, a cert controller, and a webhook. All three should reach Running and 1/1 ready before proceeding.
One discovery: the current ESO version uses apiVersion: external-secrets.io/v1, not v1beta1 as shown in older documentation. The correct API versions can be confirmed with:
kubectl api-resources --api-group=external-secrets.io
Connecting ESO to OpenBao
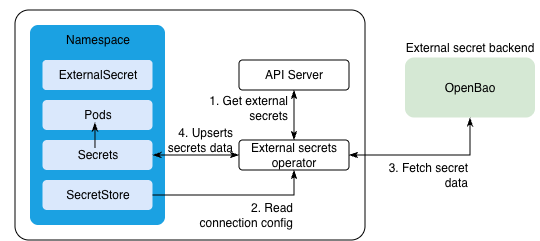
The SecretStore tells ESO where OpenBao lives and how to authenticate. A SecretStore is namespace-scoped — only ExternalSecret resources in the same namespace can reference it. A ClusterSecretStore would make the connection available cluster-wide, which is convenient when multiple namespaces need secrets, but it violates least privilege: any namespace could then create an ExternalSecret and read from the KV store.
Since the only consumer right now is cert-manager, a SecretStore scoped to the cert-manager namespace is the correct choice. When Part 2 adds secrets for other namespaces, each gets its own SecretStore.
The diagram below shows the full flow — from the ExternalSecret declaration in the namespace, through the SecretStore connection config, out to OpenBao, and back as a Kubernetes Secret consumed by pods.
# apps/openbao/secretstore-openbao.yaml
apiVersion: external-secrets.io/v1
kind: SecretStore
metadata:
  name: openbao
  namespace: cert-manager
spec:
  provider:
    vault:
      server: "http://openbao.openbao.svc.cluster.local:8200"
      path: "secret"
      version: "v2"
      auth:
        kubernetes:
          mountPath: "kubernetes"
          role: "eso"
kubectl apply -f apps/openbao/secretstore-openbao.yaml
kubectl get secretstore openbao -n cert-manager
NAME      AGE   STATUS   CAPABILITIES   READY
openbao   67s   Valid    ReadWrite      True
Valid and Ready: True means ESO successfully connected to OpenBao and the Kubernetes auth handshake worked.
Migrating the TransIP Secret
The ExternalSecret resource defines what to fetch from OpenBao and where to create it in Kubernetes:
# infra/certificates/externalsecret-transip.yaml
apiVersion: external-secrets.io/v1
kind: ExternalSecret
metadata:
  name: transip-secret
  namespace: cert-manager
spec:
  refreshInterval: 1h
  secretStoreRef:
    name: openbao
    kind: SecretStore
  target:
    name: transip-secret
    creationPolicy: Owner
  data:
    - secretKey: apiKey
      remoteRef:
        key: cert-manager/transip
        property: apiKey
First, delete the existing manually-created secret:
kubectl delete secret transip-secret -n cert-manager
Then apply the ExternalSecret:
kubectl apply -f infra/certificates/externalsecret-transip.yaml
ESO detects the new resource, fetches the apiKey property from secret/cert-manager/transip in OpenBao, and creates a new transip-secret Kubernetes Secret in the cert-manager namespace. The entire cycle completes in seconds:
kubectl get externalsecret -n cert-manager
NAME             STORETYPE     STORE     REFRESH INTERVAL   STATUS         READY   LAST SYNC
transip-secret   SecretStore   openbao   1h                 SecretSynced   True    35m
Verifying cert-manager End-to-End
All certificates should still be valid immediately after migration — ESO recreates the secret before cert-manager has time to notice it was gone:
kubectl get certificates -A
NAMESPACE         NAME                                       READY
authelia          authelia-tls                               True
cert-manager      cert-manager-webhook-transip-ca            True
forgejo           forgejo-tls                                True
garage            garage-s3-tls                              True
it-tools          it-tools-tls                               True
longhorn-system   longhorn-tls                               True
monitoring        alertmanager-tls                           True
monitoring        grafana-tls                                True
traefik           traefik-dashboard-tls                      True
To confirm the full chain works — not just that existing certificates are valid, but that cert-manager can issue a new one using the OpenBao-managed key — delete one certificate secret to force a renewal:
kubectl delete secret it-tools-tls -n it-tools
Watching the certificate object while this runs:
kubectl get certificate it-tools-tls -n it-tools -w
NAME           READY
it-tools-tls   True
it-tools-tls   False   ← secret deleted, renewal triggered
it-tools-tls   False   ← DNS-01 challenge in progress
it-tools-tls   True    ← new certificate issued
Confirming the new certificate from Let's Encrypt:
echo | openssl s_client -connect it-tools.vluwte.nl:443 2>/dev/null \
  | openssl x509 -noout -dates -issuer
notBefore=Apr  1 19:29:00 2026 GMT
notAfter=Jun 30 19:28:59 2026 GMT
issuer=C=US, O=Let's Encrypt, CN=R13
A new certificate, issued today, via the TransIP API key stored in OpenBao. The chain is complete.
What's Working Now
- ✅ OpenBao installed on Bletchley (Helm, Raft on Longhorn PVC, ARM64)
- ✅ OpenBao initialised and unsealed (3 key shares, threshold 2, stored in 1Password)
- ✅ KV v2 secrets engine and Kubernetes auth configured
- ✅ TransIP API key migrated from plain Kubernetes Secret into OpenBao
- ✅ ESO installed and connected to OpenBao via SecretStore
- ✅ ExternalSecret syncing TransIP key into cert-manager namespace
- ✅ All certificates valid, new certificate issued end-to-end
- ⚠️ Known gap: Remaining cluster secrets (Authelia, Garage, Alertmanager) still plain Kubernetes Secrets — Part 2
- ⚠️ Known gap: Manual unseal required after every OpenBao restart — Part 3
- ⚠️ Known gap:
openbaocontainer PodSecurity warning — upstream chart limitation, openbao-helm#154
What's Next
One secret is now properly managed. The cluster has a vault. The pattern — OpenBao → ESO → Kubernetes Secret → workload — is proven and working.
Part 2 migrates the remaining credentials: the Authelia session and storage secrets, the Garage S3 credentials, and an SMTP password for Alertmanager. Several of these require more care than a simple API key because they are consumed differently or were chart-generated.
Part 3 eliminates the manual unseal requirement by setting up a second OpenBao instance on Proxmox as a Transit auto-unseal backend. That is the step that makes the cluster genuinely operationally sound — a vault that can unseal itself after a power cycle, without requiring manual intervention before any secret-dependent workload can start.
← Previous: k9s
Questions or suggestions? Leave a comment below or reach out at igor@vluwte.nl.